Create Magento 2 extension step by step
The Magento eCommerce is built upon modules. there each module is a group of directories containing blocks, controllers, helpers, and models that are needed to create a specific store feature. In this article, we will help you with a guide to create Magento 2 extension.
To better understand the structure of the Magento 2 extension, I suggest you start looking at the Magento Catalog in the path vendor\magento\module-catalog
In the content of this article, we only learn the most basic files to start with the simplest module.
Let go! First we create a magento theme folder structure like below:
app/code/vendor name/
├── module name/
│   ├── etc/
│   │   ├── frontend/
│   │	│   ├── routes.xml
│   │   ├── module.xml
│   ├── Controller/
│   │   ├── Index/
│   │	│   ├── Sayhello.php
│   ├── registration.php
│   ├── composer.json
You can copy all its from vendor\magento\module-catalog then we will edit each.
1. Edit registration.php to declare your module
Add vendor name and module name Magerubik_simple like below:
<?php
\Magento\Framework\Component\ComponentRegistrar::register(
    \Magento\Framework\Component\ComponentRegistrar::MODULE,
    'Magerubik_simple',
    __DIR__
);
2. Edit composer.json declare the libraries your project depends
{
    "name": "magerubik/module-simple",
    "description": "Magerubik Simple",
    "require": {
        "php": "^7.1.0",
        "magento/module-inventory": "*"
    },
	"suggest": {
        "magerubik/module-ajaxcart": "Install module-ajaxcart provides a better shopping experience"
    },
    "type": "magento2-module",
    "version": "1.0.0",
    "license": [
        "OSL-3.0",
        "AFL-3.0"
    ],
    "autoload": {
        "files": [
            "registration.php"
        ],
        "psr-4": {
            "Magerubik\\Simple\\": ""
        }
    }
}
- In there
- – “require”: you can add additional modules that are needed to install this module.
- – “suggest”: it is not necessary, but you can add additional modules that are like the related modules.
3. Edit module.xml declare the module your module depends and your module version
<?xml version="1.0"?>
<config xmlns:xsi="http://www.w3.org/2001/XMLSchema-instance" xsi:noNamespaceSchemaLocation="urn:magento:framework:Module/etc/module.xsd">
    <module name="Magerubik_Simple" setup_version="1.0.0">
        <sequence>
            <module name="Magerubik_all"/>
        </sequence>
    </module>
</config>
- In there
- – “sequence”: list the modules on which the current module depends. It means that the current module uses another module’s class and model, so it cannot work properly without these modules and your module has to load after them.
- – “setup_version”: indicate current version. Magento will check it with the version already installed if not match Magento will perform the upgrade process.
4. Edit routes.xml declare frontend route
The Route will define a name for a module which we can use in the URL to find the module and execute the controller action.
<?xml version="1.0"?>
<config xmlns:xsi="http://www.w3.org/2001/XMLSchema-instance" xsi:noNamespaceSchemaLocation="urn:magento:framework:App/etc/routes.xsd">
    <router id="standard">
        <route id="simple" frontName="simple">
            <module name="Magerubik_Simple" />
        </route>
    </router>
</config>
5. Create simple controller to check route working
You need create file Sayhello.php like below
<?php
namespace Magerubik\Simple\Controller\Index;

class Sayhello extends \Magento\Framework\App\Action\Action
{
	protected $_pageFactory;

	public function __construct(
		\Magento\Framework\App\Action\Context $context,
		\Magento\Framework\View\Result\PageFactory $pageFactory)
	{
		$this->_pageFactory = $pageFactory;
		return parent::__construct($context);
	}

	public function execute()
	{
		echo "Hello World";
	}
}
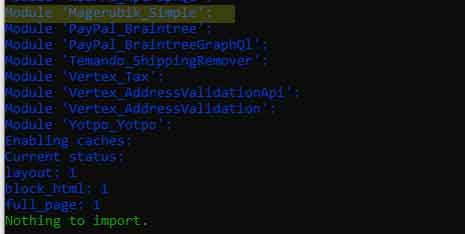
6. Check module working
Run upgrade command, if you see the below screenshot everything is fine.
php bin/magento setup:upgrade
php bin/magento setup:static-content:deploy -f
Open link http://your_host_domain/simple/index/sayhello

Note: Please check the permission folder if you see a blank page or missing style.
Now, we know how to create a Magento 2 extension. In the next posts we will learn how to make data and function for it. Contact us if you face any problems during the installation process.
You can download the demo code for this entire series from GitHub