Create Magento 2 theme options
The important part of the Magento 2 theme is to give clients who are not familiar with complex techniques to choose from the backend. In this article, we will create Magento 2 theme options by creating the module Themeoptions.
If you still don’t know how to create a Magento 2 module please click here to read it before.
Let go! First we create module Themeoptions folder structure like below:
app/code/Magerubik/
├── Themeoptions/
│   ├── etc/
│   │   ├── adminhtml/
│   │   │   ├── system.xml
│   │   ├── module.xml
│   │   ├── config.xml
│   ├── registration.php
│   ├── composer.json
Assume that we already know how to create basic files for module declaration. So we only discuss two files system.xml and config.xml.
1. Uudate file system.xml to create Magento 2 theme options
Add below content to this file:
<?xml version="1.0"?>
<config xmlns:xsi="http://www.w3.org/2001/XMLSchema-instance" xsi:noNamespaceSchemaLocation="urn:magento:module:Magento_Config:etc/system_file.xsd">
    <system>
        <tab id="magerubik" translate="label" sortOrder="99">
            <label>Magerubik Extensions</label>
        </tab>
        <section id="mrThemes" translate="label" type="text" sortOrder="999" showInDefault="1" showInWebsite="1" showInStore="1">
            <class>separator-top</class>
            <label>Magerubik Themeoptions</label>
            <tab>magerubik</tab>
            <resource>Magerubik_Themeoptions::config_themeoptions</resource>
			<group id="general" translate="label" type="text" sortOrder="10" showInDefault="1" showInWebsite="1" showInStore="1">
				<label>General</label>
                <field id="text_color" translate="label" type="text" sortOrder="1" showInDefault="1" showInWebsite="1" showInStore="1">
                    <label>Text Color</label>
					<validate>mr-color</validate>
					<comment>
                        <![CDATA[
                            <script type="text/javascript">
                                require(['mrcolorpicker']);
                            </script>
                        ]]>
                    </comment>
                </field>
				<field id="defaul_top_banner_enable" translate="label" type="select" sortOrder="2" showInDefault="1" showInWebsite="1" showInStore="1">
					<label>Enable defaul top banner</label>
					<source_model>Magento\Config\Model\Config\Source\Yesno</source_model>
				</field>
				<field id="top_banner_image" translate="label" type="image" sortOrder="3"  showInDefault="1" showInWebsite="1" showInStore="1">
                    <label>top banner Image</label>
                    <comment>Allowed file types: jpg, jpeg, gif, png.</comment>
                    <backend_model>Magento\Config\Model\Config\Backend\Image</backend_model>
                    <upload_dir config="system/filesystem/media" scope_info="1">themeoptions</upload_dir>
                    <base_url type="media" scope_info="1">themeoptions</base_url>
					<depends>
						<field id="defaul_top_banner_enable">1</field>
					</depends>
                </field>
			</group>
            <group id="font" translate="label" type="text" sortOrder="55" showInDefault="1" showInWebsite="1" showInStore="1">
                <label>Font</label>
                <field id="size" translate="label comment" type="select" sortOrder="0"  showInDefault="1" showInWebsite="1" showInStore="1">
                    <label>Basic Font Size : </label>
                    <source_model>Magerubik\Themeoptions\Model\System\Config\Size</source_model>
                </field>
            </group>
        </section>
    </system>
</config>
Then make options font size by create file app\code\Magerubik\Themeoptions\Model\System\Config\Size.php with below content:
<?php
namespace Magerubik\Themeoptions\Model\System\Config;

class Size implements \Magento\Framework\Option\ArrayInterface
{
    public function toOptionArray()
    {
		return array(
			array('value' => '12px',	'label' => __('12 px')),
			array('value' => '13px',	'label' => __('13 px')),
            array('value' => '14px',	'label' => __('14 px')),
            array('value' => '16px',	'label' => __('16 px'))
        );
    }
}
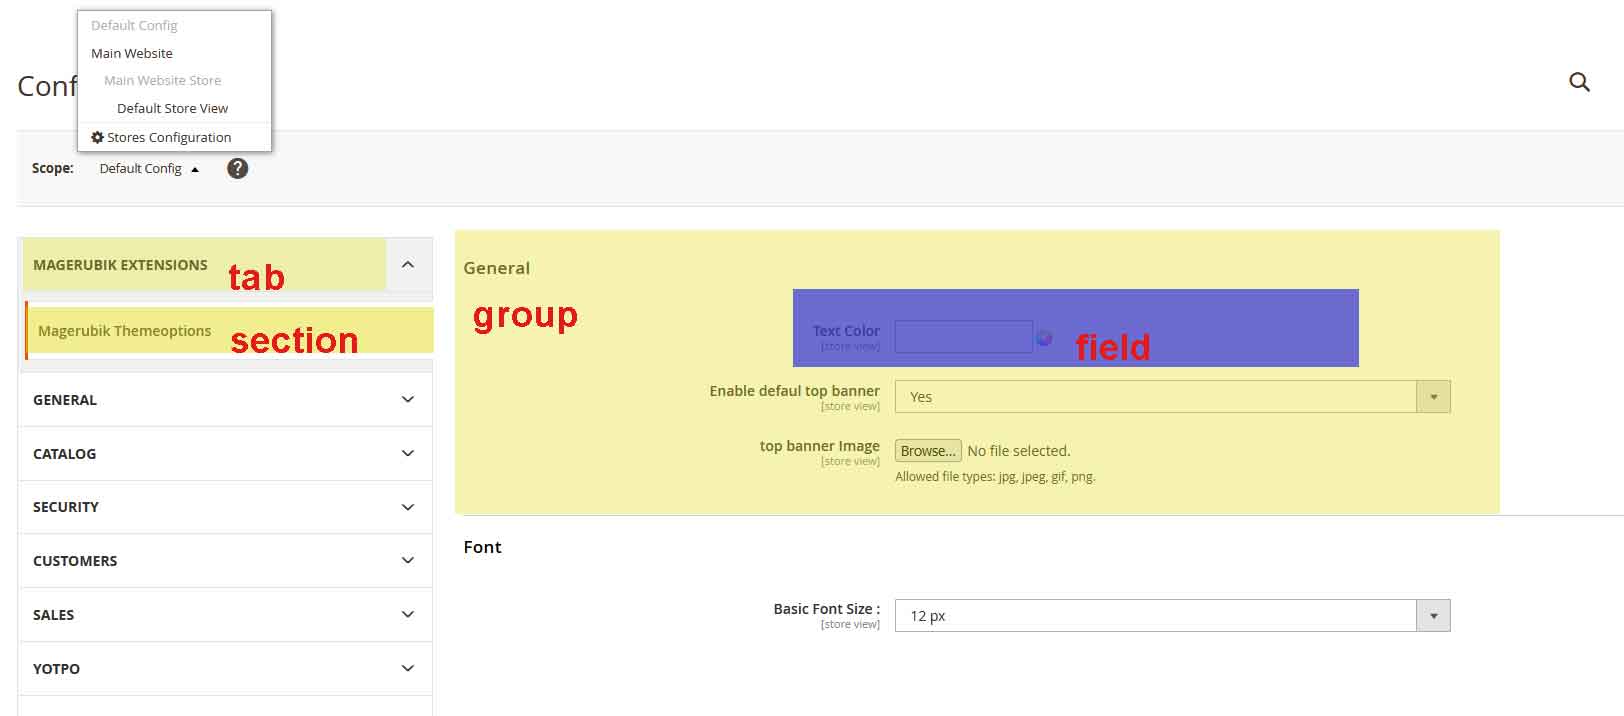
2. Go to the backend to see the result
If you see the below screen evrything is fine.
To learn more about the file’s component structure, you can refer to here
Note:
id: must be unique. So you can add content to a tab, section from another module. For example: if you want to add content to the shipping method we have section id=”carriers”.
<?xml version="1.0"?>
<config xmlns:xsi="http://www.w3.org/2001/XMLSchema-instance" xsi:noNamespaceSchemaLocation="urn:magento:module:Magento_Config:etc/system_file.xsd">
    <system>
        <section id="carriers">
			<!-- Your content -->
        </section>
    </system>
</config>
comment: you can add html by using <![CDATA[//]]>
like on our example was add the script to make a color picker
<comment>
	<![CDATA[
		<script type="text/javascript">
			require(['mrcolorpicker']);
		</script>
	]]>
</comment>
validate: you can add default validate class from Magento to make validate fields or add your class to make your style.
frontend_model: use when you want add your html.
backend_model: use when you want to modify the configured values.
source_model: use when you want to provide a specific set of values.
2. Make Default Values
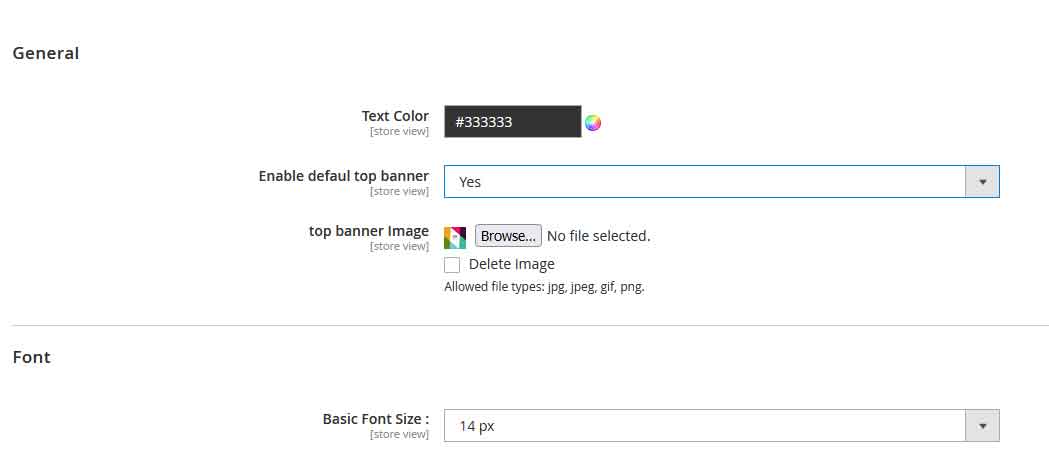
Create file app\code\Magerubik\Themeoptions\etc\config.xml then add below content to make default value.
<?xml version="1.0"?>
<config xmlns:xsi="http://www.w3.org/2001/XMLSchema-instance" xsi:noNamespaceSchemaLocation="urn:magento:module:Magento_Store:etc/config.xsd">
    <default>
        <mrThemes><!-- section Id -->
            <general><!-- group Id -->
                <text_color>#333</text_color><!-- field Id -->
                <defaul_top_banner_enable>0</defaul_top_banner_enable>
                <top_banner_image>default-banner.jpg</top_banner_image>
            </general>
			<font>
                <size>14px</size>
            </font>
        </mrThemes>
    </default>
</config>
Go to the backend If you see the below screen evrything is fine.
Now, we know how to Create Magento 2 theme options with system.xml file. In the next posts we will learn how to get it on frontend. Contact us if you face any problems during the installation process.
You can download the demo code for this entire series from GitHub